The Perfect Backpacker Studio

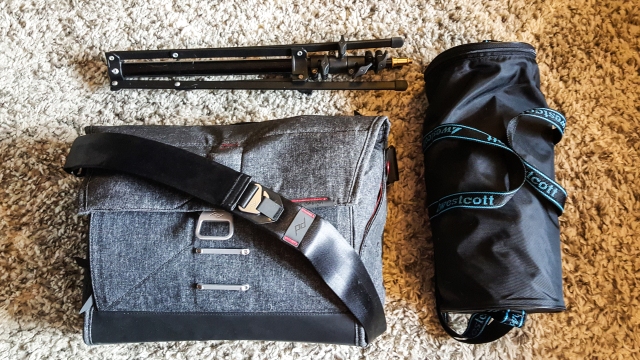
I’ll be the first one to admit it, I’m a camera gear junkie. When I first started out many years ago I thought that you needed a ton of gear to get awesome results.  Through the years I’ve learned its not the gear you have but the quality of light falling on your subject. Don’t get me wrong the more lighting gear the better, but for on-location shoots with one model sometimes you get better results with minimal gear. Every photographer will eventually shoot on location and that is why it is essential to have a go to on location kit thats easily transportable. I use to bring tons of gear to on-location shoots such as elinchrom / alien bees studio strobes, beauty dishes, soft boxes, strip boxes, etc. But after a few dozen shoots, all this gear gets really heavy, really fast and sometimes isn’t ideal for some locations. The solution? Create a mininalizt kit that will product great results and great quality of light, enjoy!

backpackerstudio1backpackerstudio2

Canon 5D Mark III – Plain and simple you need this camera, its a beast

Westscott Rapid Box –  The rapid box is a Octabox / beauty dish that delivers awesome results with either a small speed light or a medium strobe and is and compact when packed up. The perfect light modifyer for traveling to on-location shoots.

Flashpoint Streaklight 360 with power pack and triggers – This is a bare bulb flash which is the equivalent power of 6 speedlights. Use this as your Key light, the power can be conveniently be adjusted on camera with it proprietary trigger. The battery pack is also good for about 1800 full power flashes.

Youngnuo YN600rt speedlight – Do yourself a favor, pickup this cheap flash and leave your expensive speedlights at home, save them for when you shoot events. This flash is basically a copy of the $600 Canon 600RT speedlight. They run for about $100 on amazon and are great when you just need a flash for fill light. Plus if this flash goes over in the wind, you’ll be happy it was your cheaper flash and not your expensive $600 speedlight.

Sekonic Litemaster Pro light meter – Most will argue if you necessary need a light meter? Well for dead on accurate exposure, I would recommend it.

Manfroto Nano Stand – This stand is a lightweight stand that is extremely compact when folded. While its not ideal for studio strobes, it does the job for speedlights.

White balance lens cap -Why do in post production what you can do in camera. Take a few minutes and dial in that white balance.

Memory cards -Always have plenty of memory cards on hand.


Posted in Uncategorized | Leave a comment

Peak Design Everyday Messenger Bag

Today I picked up the widely anticipated Everyday Messenger Bag by Peak Design to feed my camera bag addiction. My first impressions of this bag was superb. The build quality and ascetics that Peak Design engineered into this bag is impressive. I bought this bag with the intention of using it just as a camera bag but after a few hours with it I plan on using it as my everyday bag.

While this bag is ultimately a camera bag, I don’t think its a bag for shooting wedding and events. Peak Design boasts that this bag can fit lots of gear, but I personally only see it holding a pro camera body (with no grip) with a 24-70mm , 70-200mm, and a flash which isn’t enough gear to shoot a wedding. However with that being said, if you want to transport minimal gear or just a great bag for scouting and on location shoots such as portraits or engagements, then this is the bag for you. Stay tuned for a full review, in the meantime enjoy some product pics I took below.

http://www.evolpephotography.com

Posted in Uncategorized | Leave a comment

TOP 5 WEDDING PHOTOGRAPHY TIPS TO THE BRIDE AND GROOM IN NEW JERSEY

Wedding Photography Tip #1 Get A Timeline!

While photographers are usually good about setting a schedule, It can be easy for the photographer to miss a part of the wedding. Its vital for the bride and groom to provide you with a timeline for the day. For example, the approximate times or the sequence of events such as speeches, dances, cake cutting, etc; The more information the photographer has the better. This way we will know exactly where and when to be to ensure nothing is missed. While we are on the subjects of lists, also make sure to get a list of names for the bridal party so you know who they are. Also make sure to get the cell phone numbers of the maid of honor and the best man since they are usually key players.


Wedding Photography Tip #2 Bride and Groom Portraits!

Its important that the photographer get at least one hour just with the bride and groom (nobody else in the wedding party) in order to get those amazing photos that they expect.


Wedding Photography Tip #3 Must Have Shots!

One thing you will hear more than any other is that the photographer missed getting a certain photo. The best way to avoid this is to have the bride create a shoot list before the wedding. Have her give you a list or some sample photos of the must have poses that she really wants. Print out a list and mark each one off on wedding day. It’s also a good idea to have the couple appoint you someone that knows all the ‘key players’ as your go-to person. They can round up all of the bridal parties and family members for all formal family shots. This is especially helpful since the bride and groom are in most of the shots.


Wedding Photography Tip #4 Tell The Bridal Party To SMILE!

Before the ceremony starts make sure to tell the bride party to SMILE when they are walking down the aisle. The party tends to look down and forgets to smile not realizing they are being photographed.


Wedding Photography Tip #5 Talk With The priest!

Different churches have different rules about shooting in the church. Some churches allow flash photography while some don’t and some churches have restrictions on where the photographer can be during the ceremony.

Posted in Uncategorized | Leave a comment

A Portrait Session With Michelle – Make Your Client Comfortable In-front of the Camera

Last week I had the privilege of working with Michelle on a portrait session. A very humbling experience as just a few minutes into it I discovered that she runs 5k’s, skydives, and climbs mountains (Quite Literally) like Mt kilimanjaro. Moral of the story is to connect with your client, It helps them relax in front of the camera especially if they just met you for the first time.

Lets face it, your clients are going to be nervous. Maybe its their first time in front of the camera on a professional level, or they are unsure how to pose, or maybe they feel awkward. A lot of photographers have their own way of connecting with a client. I tend to give a lot of high fives, tell really bad jokes, and embarras myself just a little bit. Anything you can to help them feel more comforable and loosen them up will make your photographs that much better.

Michelle-6

Michelle-44

Michelle-62

Michelle-92

Posted in Uncategorized | Leave a comment

Washington DC In The Rain

Surprised my girlfriend with a weekend trip to DC, but what I didn’t do was check the weather before booking the hotel.  Even though it was non-stop rain we still managed to have fun. Some pictures below were taken with the NX300 and some with my cell. Enjoy..

Mars RoverSAMSUNG CSC

Spaceship OneSAMSUNG CSC

Spirit of St. LouisSAMSUNG CSC

U2 Spy PlaneSAMSUNG CSC

Apollo Training ModulesSAMSUNG CSC

Apollo Command Module Control PanelSAMSUNG CSC

The Wright Brothers PlaneSAMSUNG CSC

Air BalloonSAMSUNG CSC

Redbull Stratos Capsule SAMSUNG CSC

Natural History Museum SAMSUNG CSC

T-RexSAMSUNG CSC

Hope Diamond BackSAMSUNG CSC

Hope Diamond FrontSAMSUNG CSC

Medals of Honor – Navy – Army – Air Force DC-14

My Girlfriend’s friend that she served with in the Army: Josh’s Grave at Arlington National Cemetery, Wish I had the privilege to meet you R.I.P.DC-15

Tomb of The Unknown SoldierDC-16

The WWII Memorial with Lincoln Memorial in the backgroundDC-17

Changing of the GuardDC-18


Posted in Uncategorized | Leave a comment

A rare look inside a WWII B-17 Bomber Mid-Flight

A look inside a WWII B-17 Bomber mid flight.  What a privilege and experience to fly in a plane this historic since there is only less than 14 left flying in the world.

b17 cockpit-1watermarked b17-detail-1watermarked b17-detail-2watermarked b17-detail-3watermarked b17-detail-4watermarked b17-detail-5watermarked b17motion

Posted in Uncategorized | Leave a comment

Highspeed Photography

Today I thought I’d try a concept that i’ve seen in books and videos called highspeed photography. Essentially this is capturing images with a remarkably fast shutter speed to “freeze motion” Heres a quick breakdown of the setup I used for all you photographers (Sorry for the bad drawing via ipad)

  • Boomstand with a spoon clamped to the end of the boom. Spoon at even hight with the camera.
  • Camera mounted onto a tripod with 70-200 lens
  • Red background paper
  • Two light setup: studio strobe as the keylight (camera left) on the subject and a speedlight (camera right) pointed to the background area approximate to the subject. This can be just as easily done with one light however lighting the background gives the subject separation from the background.
  • Since I couldnt find my shutter release (an off camera remote usually wired that triggers the shutter), I decided to shoot the sequence using canon’s remote shooting software. For those of you that don’t know what this is, its software that allows you to use the all the functionality of the camera on your computer (Screenshot below *Note these are not the actual settings I used).

  • With my setup complete I proceeded to dial in the the camera settings for exposure, ambient light, and strobe output. Once this was done I focused the lens with the strawberry in the spoon and then placed the lens on manual focus so the camera’s focusing system wouldn’t constantly correct itself. Doing this will give you consistent tack sharp images given that you don’t move the camera.
  • With the software running, I placed the mouse cursor over the shutter button and used my bluetooth mouse as a wireless camera trigger (pretty good right!!?).

With laptop mouse in hand I proceeded to drop the strawberry into a spoonful of milk. A helpful tip is to take a few practice drops; At first I was completely missing the spoon and either triggering the camera to early or triggering it to late missing that sweet spot. Take a look at some of the unedited failed samples to give you a better idea

  • Success!! Finally after what felt like a hundred attempts I was able to put it all together.

  • Disclaimer make sure you do this in an open area as its really…really…really messy. I had milk splatter all of me, my backdrop (thankfully it was only paper), my camera, flashes, stands, and on the floor. Make sure you put down some newspapers or paper towels on the floor to soak up the discharged milk. This was a lot of fun to do so give it a try! Go out and shoot 🙂
Posted in Uncategorized | Tagged | 2 Comments

Hello world!

Welcome to WordPress.com. After you read this, you should delete and write your own post, with a new title above. Or hit Add New on the left (of the admin dashboard) to start a fresh post.

Here are some suggestions for your first post.

  1. You can find new ideas for what to blog about by reading the Daily Post.
  2. Add PressThis to your browser. It creates a new blog post for you about any interesting  page you read on the web.
  3. Make some changes to this page, and then hit preview on the right. You can always preview any post or edit it before you share it to the world.
Posted in Uncategorized | Leave a comment